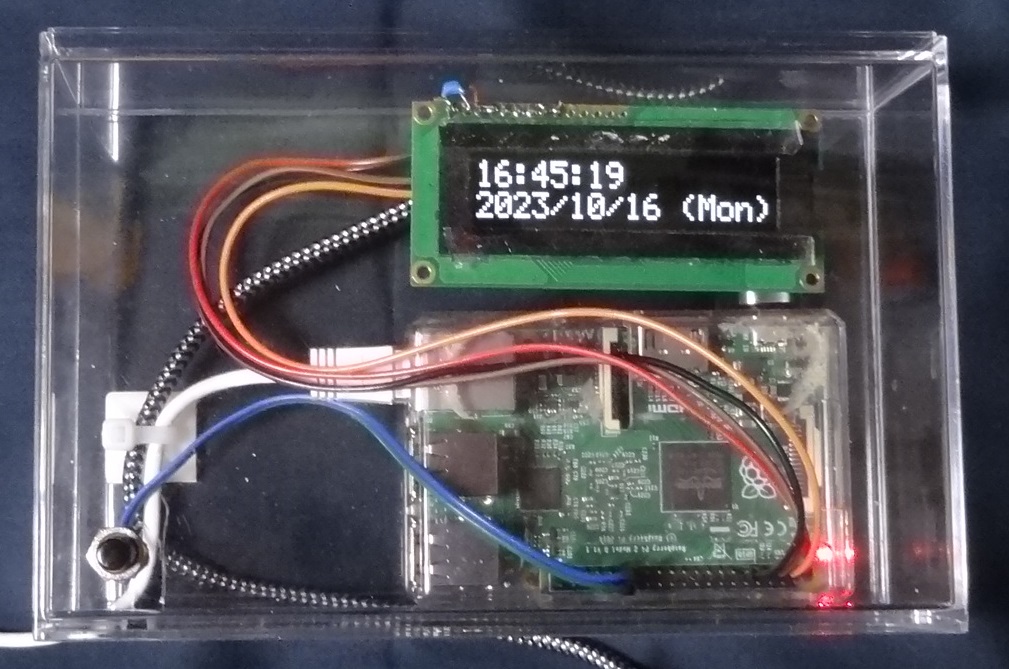
夜中に目が覚めた時など今何時かと思うことがありますよね。こんな時に便利で正確な時計を自作しようと思い立ち作業開始です。
仕様の決定
- 正確であること
常に±1秒以内位ならよしとする。この精度を実現するには、標準電波を受信する電波時計、衛星電波を受信するGPS時計などが考えられると思いますが、実際に制作して使用するとなるとかなり大掛かりになったり、特に電波の受信に問題が発生すると思われます。ネットワークに接続可能なパソコンがあればNTPにより常に正確な時間が確保出来ると思います。小型でNETにつながるパソコンとなるとRaspberryPi以外にないと思われます。ただし現時点(2023/07/05)でwifiが内蔵されたRaspberrypiは3種類ほど有りますがどれも大変高価で新たに購入する訳にいきません。そのため手持ちのRaspberryPi2Bを使用する事にします。 - 視認性のよいこと
従来型の液晶表示器では視認性がよいとは、とてもいえない。かといって、LED表示器では消費電流の点で問題があると思われます。有機ELディスプレイは自分自身が発光しているので視認性の点で問題ないと思われます。 - オプションは必要ない
目覚ましなどのオプションは必要なし。常に正確な時間を表示していて顔を向ければ時間がわかる事が必要。目覚ましなどはスマホでOKです。
回路図の作製
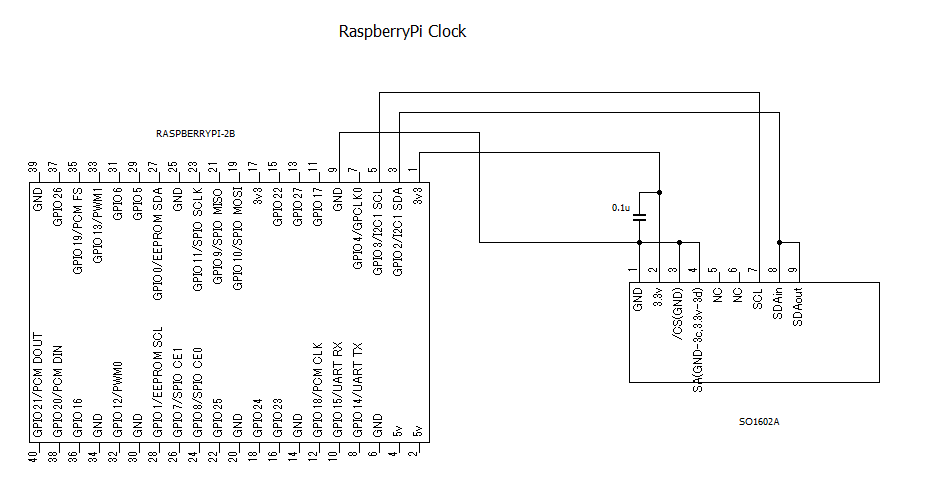
ラズパイ本体と表示器との接続は4本の線のみでOKです。
動作確認
アドレスの確認
アドレスラインのcheckをします。その前に必要なツールをインストールします。
sudo apt-get install i2c-tools
にてi2c-toolsを入れるとコマンドでi2cが使えるようになります。
terminalから i2cdetect -y 1 と入力すると下記のように出力がありaddressが0x3cである事がわかる。displayのsa端子(4pin)をGNDではなく+3.3vに接続していれば3dと出力されるはずです。もしaddressが出力されなければ接続ラインを確認する。
masa@raspberrypi:~ $ i2cdetect -y 1
     0  1  2  3  4  5  6  7  8  9  a  b  c  d  e  f
00:                         -- -- -- -- -- -- -- --
10: -- -- -- -- -- -- -- -- -- -- -- -- -- -- -- --
20: -- -- -- -- -- -- -- -- -- -- -- -- -- -- -- --
30: -- -- -- -- -- -- -- -- -- -- -- -- 3c -- -- --
40: -- -- -- -- -- -- -- -- -- -- -- -- -- -- -- --
50: -- -- -- -- -- -- -- -- -- -- -- -- -- -- -- --
60: -- -- -- -- -- -- -- -- -- -- -- -- -- -- -- --
70: -- -- -- -- -- -- -- --
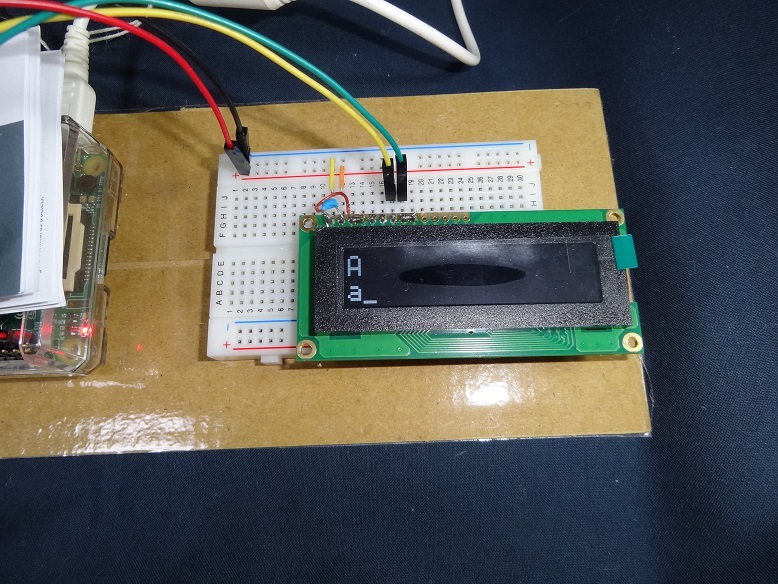
DISPLAYの表示の確認
terminalから下記のように入力する。
masa@raspberrypi:~ $ i2cset -y 1 0x3c 0 0x01
masa@raspberrypi:~ $ i2cset -y 1 0x3c 0 0x02
masa@raspberrypi:~ $ i2cset -y 1 0x3c 0 0x0f
masa@raspberrypi:~ $ i2cset -y 1 0x3c 0x40 0x41
masa@raspberrypi:~ $ i2cset -y 1 0x3c 0 0xa0
masa@raspberrypi:~ $ i2cset -y 1 0x3c 0x40 0x61
masa@raspberrypi:~ $
下記のように表示されればOKです。1行目の左端にAが表示され2行目の左端にaが表示されているはずです。
NTPの確認・変更
Raspberry Pi OSには標準でNTPの機能が設定されており、DebianのNTPサーバーにアクセスしているようです。特にこのままでもいいと思いますが、日本のサーバーに変更する事にします。
まず変更前の状態を確認する。
masa@raspberrypi:~ $ sudo systemctl status systemd-timesyncd.service
● systemd-timesyncd.service - Network Time Synchronization
     Loaded: loaded (/lib/systemd/system/systemd-timesyncd.service; enabled; vendor preset: enabled)
     Active: active (running) since Wed 2023-09-20 16:11:59 JST; 12min ago
       Docs: man:systemd-timesyncd.service(8)
   Main PID: 256 (systemd-timesyn)
     Status: "Initial synchronization to time server [2400:8902::f03c:93ff:fe8a:31c9]:123 (2.debian.pool.ntp.org)."
      Tasks: 2 (limit: 1595)
        CPU: 619ms
     CGroup: /system.slice/systemd-timesyncd.service
             └─256 /lib/systemd/systemd-timesyncd

 9月 20 16:11:59 raspberrypi systemd[1]: Starting Network Time Synchronization...
 9月 20 16:11:59 raspberrypi systemd[1]: Started Network Time Synchronization.
 9月 20 16:12:43 raspberrypi systemd
debian.pool.ntp.orgとsynchronizeしているのが分かります。設定を変更してntp.nict.jpとsynchするようにします。変更するfileは/etc/systemd/timesyncd.confです。
作業する前にバックアップをしておきます。
masa@raspberrypi:~ $ cd /etc/systemd
masa@raspberrypi:/etc/systemd $ ls -l timesyncd.conf*
-rw-r--r-- 1 root root 677  9月 13  2022 timesyncd.conf
masa@raspberrypi:/etc/systemd $ sudo cp -p timesyncd.conf timesyncd.conf.org
masa@raspberrypi:/etc/systemd $ ls -l timesyncd.conf*
-rw-r--r-- 1 root root 677  9月 13  2022 timesyncd.conf
-rw-r--r-- 1 root root 677  9月 13  2022 timesyncd.conf.org
masa@raspberrypi:/etc/systemd $
変更前の/etc/systemd/timesyncd.conf
#  This file is part of systemd.
#
#  systemd is free software; you can redistribute it and/or modify it
#  under the terms of the GNU Lesser General Public License as published by
#  the Free Software Foundation; either version 2.1 of the License, or
#  (at your option) any later version.
#
# Entries in this file show the compile time defaults.
# You can change settings by editing this file.
# Defaults can be restored by simply deleting this file.
#
# See timesyncd.conf(5) for details.

[Time]
#NTP=
#FallbackNTP=0.debian.pool.ntp.org 1.debian.pool.ntp.org 2.debian.pool.ntp.org >
#RootDistanceMaxSec=5
#PollIntervalMinSec=32
#PollIntervalMaxSec=2048
変更するのは2カ所です。#NTP= の#を削除してntp.nict.jpを登録する#FallbackNTP・・ の#を削除する。
変更後の/etc/systemd/timesyncd.conf
#  This file is part of systemd.
#
#  systemd is free software; you can redistribute it and/or modify it
#  under the terms of the GNU Lesser General Public License as published by
#  the Free Software Foundation; either version 2.1 of the License, or
#  (at your option) any later version.
#
# Entries in this file show the compile time defaults.
# You can change settings by editing this file.
# Defaults can be restored by simply deleting this file.
#
# See timesyncd.conf(5) for details.

[Time]
NTP=ntp.nict.jp
FallbackNTP=0.debian.pool.ntp.org 1.debian.pool.ntp.org 2.debian.pool.ntp.org 3>
#RootDistanceMaxSec=5
#PollIntervalMinSec=32
#PollIntervalMaxSec=2048
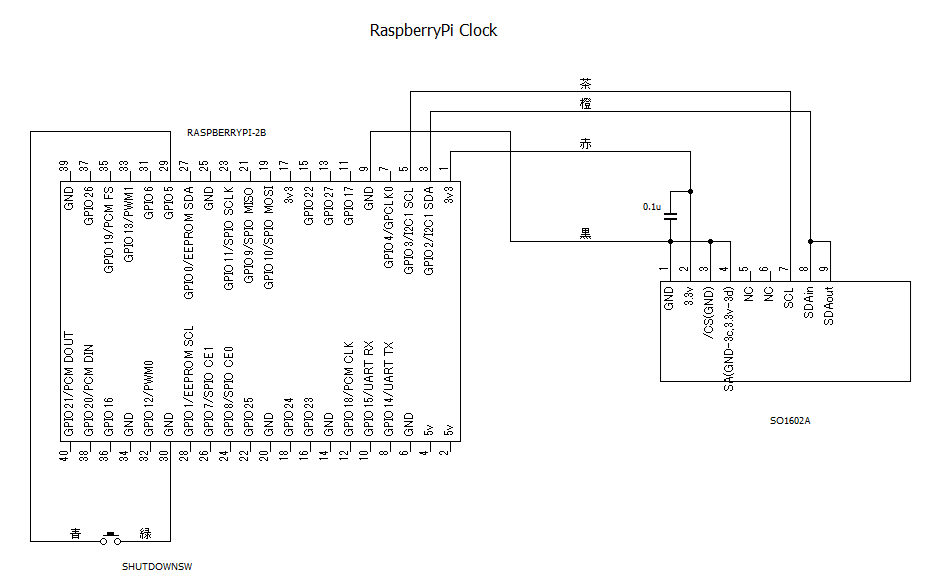
シャットダウンスイッチの追加とテスト
完成後は時計として設置してしまうので位置(設置場所)を変更したりするときに、シャットダウンするとなると面倒な事になります。モニターやキーボードを繋いだり、又は、他のCPからログインしたりなど面倒なのでシャットダウンスイッチの追加をしたいと思います。今回スイッチは、GPIO5(29PIN)とGNDの間に追加する事にします。GPIO3が使用されているためです。設定については、nanoを起動して/boot/config.txtファイルを編集して、シャットダウンの設定を追加します。
sudo nano /boot/config.txt
dtoverlay=gpio-shutdown,gpio_pin=5,debounce=3000
スイッチを3秒程度長押しするとシャットダウンされます。シャットダウンされたことの確認はラズパイ本体の緑色LEDが消灯することで行います。SWを追加した回路図を乗せておきます。
SOFTWARE
# -*- coding: utf-8 -*-

#Ver3.0
#2024/02/15 17:48
#

import smbus
import sys
from time import sleepclock_so
import datetime

bus = smbus.SMBus(1)
address_so1602A = 0x3c
send_command = 0x00
send_data = 0x40

brightness = 0x7f    # 0x00から0xffの明るさ。リセット後は0x7fに設定される
chars_per_line = 16  # LCDの横方向の文字数
display_lines = 2    # LCDの行数
position = 0
line = 0

def clearDisplay():
	bus.write_byte_data(address_so1602A, send_command, 0x01)
	sleep(0.02)

def returnHome():
	bus.write_byte_data(address_so1602A, send_command, 0x02)
	sleep(0.002)

def display_on():      # cursor off,blink offの場合
	bus.write_byte_data(address_so1602A, send_command, 0x0c)
	sleep(0.002)

def display_off():
	bus.write_byte_data(address_so1602A, send_command, 0x08)
	sleep(0.002)

def send_Linedata(str = '', line = 0):
    if (line == 1):
        bus.write_byte_data(address_so1602A, send_command, (0x80 + 0x20))
                       # 2行目の場合 DDRAM addressを0x20に設定
    else:
        bus.write_byte_data(address_so1602A, send_command, 0x80)
                       # 1行目の場合 DDRAM addressを0x00に設定
    for i in range(len(str)):
        bus.write_byte_data(address_so1602A, send_data, ord(str[i]))


def init_st7032():
	clearDisplay()
	returnHome()
	display_on()
	clearDisplay()

init_st7032()
try:
  while True:

    t_delta = datetime.timedelta(hours=9)
    JST = datetime.timezone(t_delta, 'JST')
    now = datetime.datetime.now(JST)
    data1 = now.time().strftime('%X')
    data2 = now.strftime('%Y/%m/%d (%a)')
    send_Linedata(str = data1,line = 0)
    send_Linedata(str = data2,line = 1)

except KeyboardInterrupt:
  pass
finally:
  clearDisplay()
  returnHome()
  display_off()
clockプログラムを終了するには、Ctrl+Cを同時に押す。
電源を入れると自動でclockプログラムを動作させるには/etc/rc.localに登録しておくのが簡単でいいと思います。
エディタで/etc/rc.localを開く
sudo nano /etc/rc.local
exit 0 の前に、以下の一行を挿入する(プログラムの名前がclock1.pyでディレクトリがclockの場合)
python /home/xxxx/clock/clock1.py
今後の課題
・一行目の右に使用していないエリアがある。ここを何か有効活用したい。たとえば、気温などを表示したい。
・周りの明るさを検出して自動で表示器の明るさを変更するようにしたい。
・電源を投入した際にプログラムのバージョンとIPアドレスを数秒間表示した後、本来の動作に移るようにしたい。

コメント